- Published
- March 24, 2026
What Are the 10 Items in an Earthquake Emergency Kit?


You already know that having an emergency kit is a good idea. The real question is what goes inside it to make it truly effective when you need it most. A few bottles of water and some old snacks in a bag won’t be enough when you’re facing a real crisis. A truly useful kit is thoughtfully assembled to cover your family’s core needs for several days. It provides not just survival essentials but also a sense of stability in a chaotic situation. So, let’s get specific. We’ll cover what are 10 items in a emergency kit for earthquake and then go further, discussing how to customize it for your family, where to store it, and how to keep it ready for action.
Key Takeaways
- Start with the survival basics: Your kit’s foundation should be the ten essential items, especially a multi-day supply of water, non-perishable food, a complete first aid kit, and a reliable flashlight. These core supplies ensure you can manage your immediate safety and well-being.
- Customize your kit for your family: Go beyond the basics by adding items specific to your household. This includes packing supplies for infants and pets, along with at least a week’s worth of any personal medications to keep everyone healthy and secure.
- Make maintenance a simple habit: An emergency kit is not a one-time project. Set a recurring reminder to review your supplies at least once a year, checking expiration dates on food and medicine and testing your batteries to ensure everything is fresh and functional.
What Is an Earthquake Kit and Why Do You Need One?
An earthquake kit is your personal collection of supplies to help you and your family stay safe and comfortable in the immediate aftermath of a quake. When an earthquake strikes, it can happen without any warning, potentially knocking out power, damaging roads, and disrupting water lines. Emergency services will likely be overwhelmed, which means you might need to be on your own for a while.
That’s where your kit comes in. It’s designed to help you be self-sufficient for at least 72 hours. Government agencies like Ready.gov advise everyone to have a kit with enough supplies to last for several days, giving first responders time to get to those who need the most urgent help. Having a well-stocked kit isn’t about worrying; it’s about taking control of a situation where you might otherwise feel helpless.
Think of it as one of the most important things you can do to prepare. It ensures you have essentials like water, food, and a complete first aid kit right when you need them most, without having to rely on outside help immediately. Assembling these items ahead of time is a proactive step that makes a huge difference in your ability to handle the unexpected with confidence. It’s about knowing you have the tools to care for yourself and your loved ones when it matters most.
For a detailed, category-by-category breakdown of everything your kit needs, see our complete earthquake kit checklist.
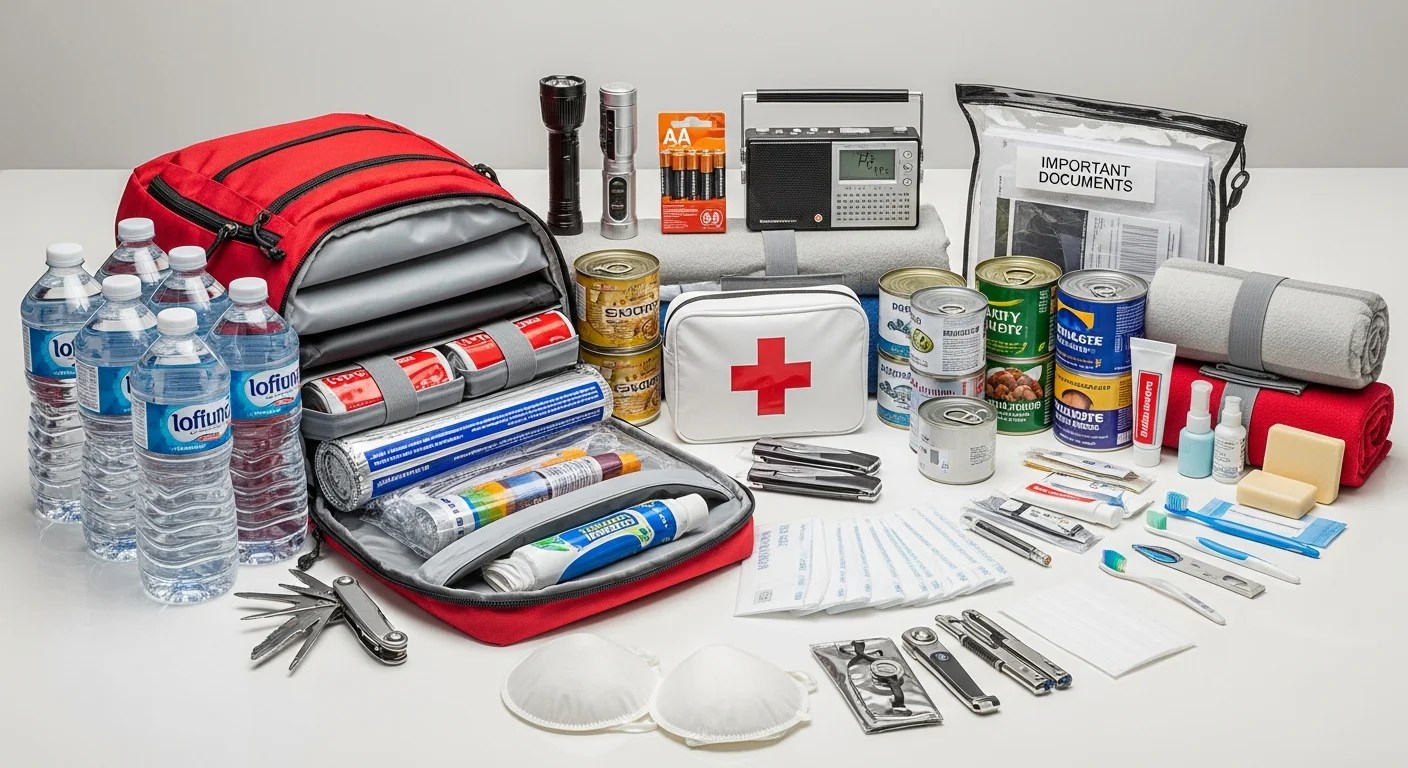
Your 10-Item Earthquake Kit Checklist
Building an earthquake kit doesn’t have to be overwhelming. The key is to start with the absolute essentials that will keep you safe and self-sufficient until help arrives. Think of this list as the foundation for your family’s preparedness plan. These are the 10 items that emergency experts agree you shouldn’t go without. Once you have these basics covered, you can customize your kit with personal items to meet your family’s specific needs. Let’s walk through each item so you know exactly what you need and why it’s so important.
1. Water: The Most Critical Supply
After a disaster, clean drinking water might not be available. Your water lines could be damaged, or the public supply could be contaminated. That’s why having your own supply is non-negotiable. The standard recommendation is to store at least one gallon of water per person, per day. Aim for a supply that will last a minimum of three days, though a two-week supply is ideal if you have the space. Don’t forget to account for pets, as they’ll need clean water too. Store commercially bottled water if possible, as it’s the safest and most reliable option.
2. Non-Perishable Food
When the power is out, you’ll need food that requires no cooking or refrigeration. Stock up on ready-to-eat canned goods, protein bars, dried fruit, and other items your family will actually eat. Comfort food can make a stressful situation a little more bearable. Plan for at least a three-day supply of food for every person in your household. And here’s a pro tip: tape a manual can opener to the inside lid of your food storage bin. It’s one of the most commonly forgotten tools, and you don’t want to be stuck with cans you can’t open.
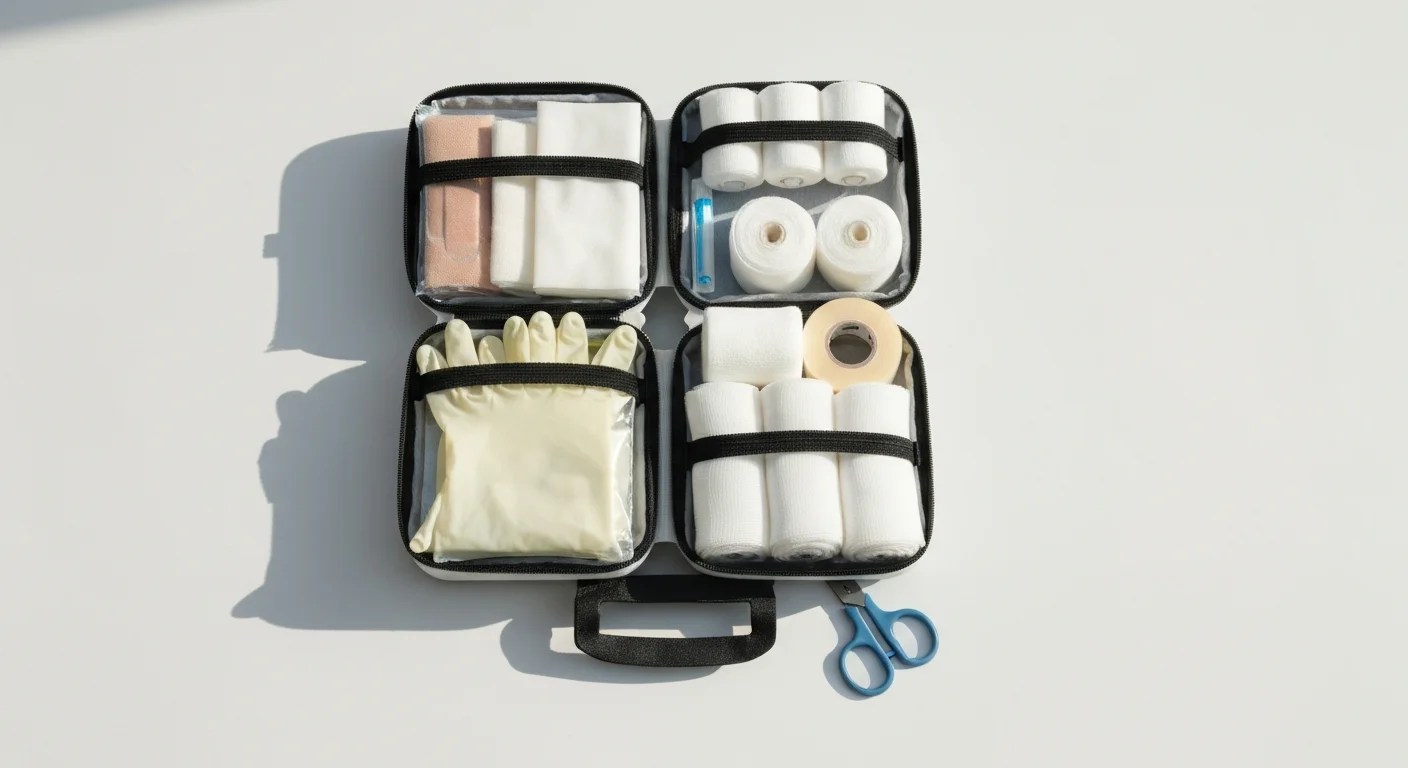
3. A Complete First Aid Kit
Minor injuries are common after an earthquake, and emergency services will be focused on the most critical cases. A well-stocked kit allows you to handle cuts, scrapes, burns, and sprains on your own. Your kit should include sterile gloves, bandages in various sizes, antiseptic wipes, gauze, adhesive tape, pain relievers, and any personal medical supplies. You can buy pre-assembled first aid kits or build your own. Check the contents twice a year and replace any expired items to ensure everything is ready when you need it.
4. Flashlight and Extra Batteries
An earthquake can happen at any time, day or night. Widespread power outages are almost certain, plunging your home and neighborhood into darkness. A reliable light source is essential for safety and to assess your surroundings. Pack at least one bright flashlight, preferably an LED one for its long battery life. Even better, include a hands-free headlamp for each family member. Store extra batteries with your flashlights, and consider keeping them outside the device to prevent corrosion. A hand-crank flashlight is also a great backup.
5. Hand-Crank or Battery-Powered Radio
When cell towers and internet services go down, a radio may be your only link to the outside world. An emergency radio will allow you to receive important updates, weather alerts, and instructions from officials. Look for a model that can be powered by batteries and a hand crank, so you’re never without power. Many emergency radios also include a built-in flashlight and a USB port to charge a cell phone, giving you even more functionality in one compact device. Make sure you know how to use it before an emergency strikes.
6. Multi-Tool
A sturdy multi-tool or a basic set of pliers can be incredibly useful after an earthquake. You might need to turn off your home’s gas or water lines to prevent further damage, and a tool is often required to do so. A multi-tool can also help with minor repairs, opening stubborn packages, or other unexpected tasks. It combines several tools, like pliers, a knife, and a screwdriver, into one compact device, saving valuable space in your kit. Keep a pair of heavy-duty work gloves with your tool to protect your hands from sharp debris.
7. Emergency Whistle
If you become trapped under debris, a whistle is your best tool for signaling for help. Shouting can exhaust you quickly, and your voice may not carry far. The high-pitched sound of a whistle, however, can travel long distances and cut through background noise, making it much easier for rescuers to locate you. Give one to each member of your family and teach them to use the universal signal for help: three sharp blasts in a row. It’s a small, lightweight item that can truly be a lifesaver.
8. Dust Masks
The air after an earthquake can be thick with dust, broken drywall, insulation, and other potentially harmful particles. Breathing this in can cause respiratory issues, especially for children, older adults, and those with asthma. A simple dust mask, like an N95 respirator, can filter the air and protect your lungs. They are inexpensive and take up almost no space in your kit, so be sure to pack one for every person in your household. This simple precaution helps you stay safe while you navigate your surroundings after a quake.
9. Plastic Sheeting and Duct Tape
These two simple items have a surprising number of uses in an emergency. If a window breaks, you can use plastic sheeting and duct tape to create a temporary patch, protecting you from the elements. You can also use them to seal a door or window if you need to shelter in place and protect your space from airborne contaminants. Duct tape is also great for quick repairs on everything from a torn tent to a leaky water bottle. Its versatility makes it a must-have for any disaster kit.
10. Copies of Important Documents
In the chaos after a major disaster, you may need to prove your identity or access critical information for insurance claims and financial assistance. Keep copies of your most important documents in a waterproof and fireproof bag. This includes driver’s licenses, birth certificates, social security cards, passports, insurance policies, and bank account records. It’s also a good idea to save digital copies on a password-protected USB drive that you keep in your kit. This small step can save you a huge amount of stress during the recovery process.
How Much Food and Water Should You Store?
When it comes to your earthquake kit, food and water are the foundation. These supplies are not just about comfort; they are essential for survival, especially when services are down and stores are closed. While official guidelines provide a starting point, thinking through your family’s specific needs is key. The goal is to have enough to sustain everyone until help arrives or services are restored, which can take longer than you think. Planning how much to store and how to store it safely will give you confidence that your most basic needs are covered.
How to Store Water Safely
The standard recommendation is to store at least one gallon of water per person, per day. While many guides suggest a three-day supply, the U.S. Geological Survey advises having enough for at least two weeks. This amount covers drinking, food preparation, and basic sanitation. Commercially bottled water is your easiest option, but you can also store tap water in clean, food-grade containers. If you go this route, add a few drops of unscented liquid chlorine bleach to keep it safe for long-term storage. Remember to store your water in a cool, dark place to maintain its quality.
How Much Food to Pack
For food, plan for a minimum of three days’ worth of non-perishable items for each person in your household. Think about foods that require no cooking or refrigeration, like protein bars, dried fruit, nuts, and canned goods. According to the California Earthquake Authority, it’s important to pack items your family will actually eat. Don’t forget a manual can opener and basic utensils. To keep everything fresh and organized, place items in airtight plastic bags and then store them in a single, easy-to-carry container like a duffel bag or plastic bin. This makes your food supply a grab-and-go part of your larger disaster preparedness kit.
What About Special Items for Your Family?
A basic earthquake kit covers the essentials for survival, but every family is different. Once you have the core ten items squared away, it’s time to personalize your kit to meet the specific needs of everyone in your household, including the little ones and furry friends. Thinking through these details now ensures no one’s needs are overlooked when stress is high and resources are scarce. This is where a good kit becomes a great one, transforming a simple box of supplies into a comprehensive support system for your loved ones.
Personalizing your kit is a critical step that goes beyond just supplies; it’s about maintaining health, comfort, and a sense of normalcy during a chaotic time. Consider anyone in your home with unique requirements: infants, toddlers, elderly relatives, individuals with disabilities, or pets. Each has needs that won’t be met by a generic kit. For example, a standard first aid kit is essential, but it won’t include your child’s favorite comfort toy or your dog’s anxiety medication. Taking the time to add these personal items will give you incredible peace of mind, knowing you’re truly ready for anything. Let’s walk through how to pack for the most common special considerations so you can build a kit that truly serves your entire family.
Packing for Children and Infants
When you have little ones, your emergency kit needs a few extra items. Pack diapers, wipes, rash cream, and formula or baby food to last several days. Don’t forget bottles and any necessary feeding supplies. It’s also smart to include extra changes of clothes, as laundry won’t be an option. Beyond the basics, think about comfort. A favorite stuffed animal, a small book, or a familiar blanket can make a huge difference in calming a child’s fears during a stressful event. Including these special provisions ensures you can care for your children’s physical and emotional needs when they need it most.
Preparing for Your Pets
Your pets are part of the family, so their needs belong in your emergency plan. Pack at least a three-day supply of their food and water, and be sure to use a can opener if you’re packing wet food. Include any medications they take daily. It’s also a good idea to have an extra leash, collar with ID tags, and a sturdy carrier in case of evacuation. A photo of you and your pet can help with identification if you get separated. Remember to create a plan for their care that covers where they might stay if you can’t return home right away. A favorite toy or blanket can also help reduce their stress.
Including Personal Medications
Maintaining your health is a top priority after a disaster, so your personal medications are non-negotiable items for your kit. Pack at least a seven-day supply of any prescription medicines you or your family members rely on. Keep a list of all medications, dosages, and any allergies in a waterproof bag. It’s also wise to include over-the-counter medicines like pain relievers, antacids, and anti-diarrhea medication. If you wear glasses or contacts, pack an extra pair and some contact solution. Having these essential health supplies on hand means you can manage your health effectively, even if pharmacies are closed or inaccessible.
Common Mistakes to Avoid When Building Your Kit
You’ve decided to build an earthquake kit, which is a huge step toward being prepared. But just having a kit isn’t enough; it needs to have the right things in it. A few common oversights can make a kit less helpful when you actually need it. Let’s walk through some of those mistakes so you can avoid them from the start.
One of the biggest errors is not packing enough water. The standard recommendation is one gallon of water per person, per day, for at least three days. It’s also easy to toss in a few snack bars and call it done, but you’ll want non-perishable foods that provide real nutrition and are easy to prepare. When you build a kit, think about meals, not just snacks.
A few adhesive bandages won’t cut it after an earthquake. Minor injuries are common, and professional medical help might be delayed. A well-stocked first aid kit should include antiseptic wipes, gauze, pain relievers, medical tape, and any personal medications your family relies on. Make sure you have enough supplies to treat common injuries for everyone in your household.
An emergency kit is not a “set it and forget it” project. Food expires, batteries lose their charge, and your family’s needs can change. A great habit is to check your kit every six months. Swap out old food and water, test your flashlight, and make sure medications are still current. Setting a recurring reminder on your phone is an easy way to stay on top of it.
In the chaos after a disaster, you might need to prove your identity or access important accounts. Yet, many people forget to include copies of their essential documents. Make photocopies of driver’s licenses, birth certificates, social security cards, and insurance policies. Store them in a waterproof, portable container within your kit. Having these important documents can save you a massive headache during recovery.
How to Build a Kit on a Budget
Building an emergency kit from scratch can feel like a big expense, but it doesn’t have to be. Preparedness is a process, not a one-time purchase. With a little planning, you can assemble a complete and reliable earthquake kit without straining your finances. The key is to be strategic and consistent. By breaking it down into smaller, manageable steps, you can build the confidence and the supplies you need to be ready for anything.
Build Your Kit Over Time
You don’t need to buy everything on your checklist at once. A great way to manage the cost is to build a kit gradually. Start by adding one or two items to your shopping list each week or with every paycheck. One week, you might grab an extra gallon of water and a few cans of soup. The next, you could pick up a flashlight and batteries. This approach spreads the cost out over several months, making it much more approachable. Before you know it, you’ll have a well-stocked kit ready to go. Just be sure to store your growing collection in a designated spot, like a sturdy duffel bag or plastic bin.
Find Budget-Friendly Alternatives
You can find many essential emergency supplies without paying premium prices. Discount and dollar stores are excellent places to look for items like batteries, dust masks, hand sanitizer, and matches. When buying food and water, consider purchasing store brands or buying in bulk to save money. While it’s smart to be frugal, a quality first aid kit is one item worth investing in to ensure you have sterile, effective supplies when you need them most. For other items, a little savvy shopping can go a long way in making your kit affordable.
Where Should You Store Your Kit?
You’ve put in the effort to gather all your essential supplies, and that’s a huge step. But the best earthquake kit in the world won’t help if you can’t get to it when disaster strikes. Choosing the right storage spot is just as important as what you put inside. The goal is to find a location that’s secure, easy to remember, and quick to access, even in a chaotic situation.
Because you never know where you’ll be when an earthquake hits, it’s a good idea to have multiple kits. A comprehensive one for your home is a must, but you should also consider smaller versions for your car and workplace. This ensures you have basic supplies no matter what. Let’s walk through how to pick the perfect spot for your home kit and keep it organized for grab-and-go readiness.
Choose a Smart, Accessible Location
The best place for your earthquake kit is somewhere you can get to in a hurry. Think about your home’s layout and potential evacuation routes. Good options include a hall closet near an exit, the garage, or under a sturdy piece of furniture like a bed. Try to avoid places that could be blocked by debris, like a deep pantry or a cluttered basement.
The federal resource Ready.gov recommends keeping your kit in a designated spot that everyone in your household knows about. Don’t just tell them where it is; show them. Making sure your family members and even a trusted neighbor know the location ensures that someone can grab it if you’re not able.
Keep Your Supplies Organized
A well-organized kit allows you to find what you need without wasting precious seconds. Start by grouping similar items together. Use airtight plastic bags to protect things like documents, batteries, and medical supplies from water damage. This also makes it easier to see what you have at a glance. A complete first aid kit is a great example of how proper organization can make a huge difference in an emergency.
Once your items are grouped, place everything into one or two easy-to-carry containers. A large backpack, a duffel bag, or a plastic bin with a secure lid are all excellent choices. The container should be durable enough to withstand being moved around but light enough for you to carry if you need to evacuate on foot.
How Often Should You Update Your Kit?
Building your earthquake kit is a huge step toward being prepared, but it’s not a one-and-done project. Think of your kit like a pantry; your supplies need to be checked and refreshed to make sure they’re ready when you need them most. Over time, food expires, batteries lose their charge, and your family’s needs can change in ways you might not expect. Setting aside a little time for regular maintenance ensures your kit remains a reliable source of support. It’s a simple habit that turns your kit from a box of supplies into true peace of mind, knowing everything inside is fresh, functional, and right for your family.
Set a Simple Maintenance Schedule
The easiest way to stay on top of your kit is to review it once a year. A great trick is to tie this task to an event you already remember, like a birthday, New Year’s Day, or when you change the clocks for daylight saving time. Set a recurring reminder on your phone so you don’t forget. During this annual check-in, use a comprehensive checklist to make sure you haven’t missed anything and think about what’s changed for your family. Do you have a new baby? Has a child outgrown their clothes or started eating solid foods? Are there new prescription medications to add? Keeping your kit aligned with your family’s current needs is just as important as having one in the first place.
Know What to Replace and When
While a full review is great annually, some items need more frequent attention. You should check and rotate your food and water supplies every six months. Canned goods and other non-perishables can last a long time, but it’s best to use them and replace them to ensure freshness. Make sure to check the expiration dates on everything, including medications, baby formula, and the batteries for your flashlight and radio. It’s also a good time to look through your first aid kit. Adhesive bandages can lose their stickiness and antiseptic wipes can dry out. Swapping out these items regularly guarantees that every part of your kit will work as expected during an emergency.
Related Articles
- The Ultimate Earthquake Emergency Kit List
- Your Complete Emergency Kit List & Checklist
- Your Emergency Kit Checklist: 20 Must-Have Items
Frequently Asked Questions
How many days should my earthquake kit actually cover? I see recommendations for three days, but also for two weeks. A three-day supply is the absolute minimum you should aim for. This 72-hour window is based on the time it may take for emergency responders to reach you. However, a major earthquake can disrupt services for much longer, so a one-week or even two-week supply of food and especially water is a much safer goal. The best approach is to start by building a solid three-day kit, and then gradually add to it over time.
Is it better to build my own kit or just buy a pre-made one? Pre-made kits are a fantastic starting point and are certainly better than having no supplies at all. They cover the basics and save you time. However, no pre-made kit will be perfectly suited to your family. You will always need to add personal items like prescription medications, eyeglasses, copies of your documents, and food that meets your family’s dietary needs. Building your own from scratch ensures it’s customized from the start, but buying a base kit and adding to it is also a great strategy.
I live in a small apartment with limited storage. Where can I possibly keep all this stuff? When space is tight, you have to get creative. Instead of one large bin, try breaking your kit into smaller, more manageable modules. A backpack with your most critical grab-and-go items can fit in a coat closet. Flat, stackable water containers can slide under a bed. A small box of non-perishable food can be stored on a high shelf in a closet. The key is to keep everything accessible and in a place you can get to quickly. Don’t forget to use your car as a secondary storage spot for a smaller kit.
What’s the best way to handle food for family members with allergies or dietary restrictions? This is a perfect example of why personalizing your kit is so critical. You should pack specific, non-perishable foods that you know are safe for your family members. This could include things like gluten-free protein bars, specific canned goods, or other specialty items. It’s a good idea to store these foods in a clearly labeled bag within your kit to prevent any mix-ups. Also, be sure to include a written list of all allergies and any necessary emergency medications, like an EpiPen, with your first aid supplies.
My kit is ready. What’s the next most important step in my family’s earthquake plan? Once your supplies are in order, the next step is to create and practice your family’s communication plan. Everyone should know what to do the moment the shaking starts, which is to Drop, Cover, and Hold On. You also need to decide on two meeting places: one just outside your home and another outside your neighborhood in case you can’t return. Talk through the plan with everyone in your household, because knowing what to do is just as important as having the right tools.
Disclaimer for information purposes only:
The information provided on this website is intended for general educational and informational purposes only. It is not medical advice and should not be used as a substitute for professional diagnosis, treatment, or care. Always consult a qualified healthcare or medical professional regarding any health-related questions or concerns.
While we strive to ensure the information shared is accurate and up to date, no guarantees are made regarding completeness, accuracy, or applicability to any individual situation. Use of this content is at the reader’s sole discretion and risk.
This website is part of the Response Ready family of emergency preparedness and training resources, including CPR & first aid training and compliance services, AED sales and program support, AED program management software, and medical oversight solutions provided through our affiliated platforms:
• CPR1.com
• AEDLeader.com
• AEDTotalSolution.com
• MDSIMedical.com
By accessing or using this website, you agree to release, indemnify, and hold harmless the website owners, authors, contributors, and affiliated entities from any claims, losses, damages, or liabilities arising from the use or reliance on the information presented.