Buying an automated external defibrillator (AED) is a fantastic first step for your home, school, or small business. But a successful rescue depends on more than just the device itself. To be truly prepared, you need to think beyond the box. Let’s talk about creating a complete life-saving station—one that is visible, easily accessible, and ready to go at a moment’s notice. This is how you turn a piece of equipment into a real rescue plan.
Many people get stuck trying to navigate complex compliance documents from sources like OSHA or the American Heart Association. Others find guides that are too narrow, focusing only on mounting a cabinet without explaining which one to choose. This guide provides a clear, practical framework. We will walk you through building the perfect AED station for your specific needs, ensuring you are not just compliant, but genuinely prepared to save a life.
Why a Reliable Alarm System Matters
Just as having an AED on hand prepares you for a sudden cardiac arrest, a reliable alarm system prepares you for other urgent threats like fire or intrusion. It’s a fundamental layer of safety that provides an early warning, giving you precious time to evacuate, seek shelter, or call for help. For organizations, this isn’t just a good idea—it’s often a legal and moral responsibility. Public and commercial buildings are typically required to have functional fire detection systems and to test them regularly to ensure they work as expected. This commitment to maintenance ensures the system can be trusted when it matters most.
Beyond compliance, a well-maintained alarm system creates a culture of safety and confidence. It shows employees, customers, or family members that their well-being is a priority. Whether it’s a smoke detector in your hallway or a comprehensive, monitored system at your workplace, these devices are your first line of defense. They stand guard 24/7, ready to alert you to danger so you can act quickly and effectively. Thinking about your complete emergency plan should include not just response tools like first aid kits, but also the warning systems that give you the head start you need.
Fire Incidents by the Numbers
It’s easy to think a serious fire won’t happen to you, but the numbers show it’s a risk we all face. In England, for example, fire and rescue services responded to over 62,500 serious fires in a single year ending in September 2023. This statistic is a powerful reminder of why functional fire alarms are non-negotiable. Each of those incidents represents a potential tragedy that could have been worsened without an early warning. A working smoke or fire alarm dramatically increases the chances of a safe outcome by providing the critical moments needed to escape before a fire grows out of control, fills a space with toxic smoke, or blocks exit routes.
Understanding Your Alarm System
At first glance, an alarm system can seem like a complex web of wires and sensors. But once you understand the basic components, it becomes much more manageable. Most systems, whether for security or fire, consist of three main parts: the sensors that detect a problem (like smoke detectors or door contacts), a central control panel that acts as the brain, and an output device (like a siren or a signal to a monitoring center) that alerts you. Knowing how these pieces fit together is the first step toward properly maintaining your system and ensuring it’s ready to protect you.
The two primary types of systems you’ll encounter are hardwired and wireless. Hardwired systems connect all the components with physical wires, while wireless systems use radio frequencies to communicate. Each has its own set of advantages and maintenance needs. Furthermore, the way your system communicates with the outside world—whether through a landline, internet, or cellular connection—is a critical factor in its reliability and speed. Understanding these core features will help you make informed decisions about testing, upgrading, and troubleshooting your specific alarm setup.
Hardwired vs. Wireless Systems
The easiest way to tell if your alarm system is hardwired or wireless is to look at the main keypad. Wireless systems are typically self-contained, with the control panel, keypad, and communicator all built into one unit you see on the wall. They are generally easier to install and identify. In contrast, hardwired systems are more decentralized. The keypad on the wall is just an interface, while the actual control panel—the metal box containing the circuit board and backup battery—is hidden somewhere else in the building. This design makes them less conspicuous but can also make finding the central panel a bit of a challenge.
Control Panels and Keypads Explained
A common point of confusion, especially with hardwired systems, is mixing up the keypad with the control panel. The keypad is the device with the buttons and screen that you use to arm and disarm the system. However, it’s just a terminal that communicates with the main control panel. The control panel is the system’s true nerve center. It’s a metal cabinet that houses the main circuit board, the backup battery, and all the wiring connections from the sensors. As Alarm Grid notes, many people mistake the keypad for the panel, but for most hardwired setups, the real brains of the operation are tucked away out of sight.
How Alarms Communicate with Monitoring Centers
If your alarm system is monitored, it needs a way to send a signal to the central station when it’s triggered. This communication path is vital, as it determines how quickly help is dispatched. The method your system uses affects its speed, reliability, and the features available to you, such as remote access through a smartphone app. There are three primary communication pathways: traditional landlines, internet (IP), and cellular. Understanding which one your system relies on is key to knowing its potential vulnerabilities—for instance, a landline can be cut, and an internet connection can go down during a power outage.
Landline, Internet, and Cellular Connections
Each communication method has its pros and cons. Landline connections are the old-school standard but are the slowest and most vulnerable, as a burglar can cut the phone line. Internet (IP) communicators are much faster but depend on your internet service; if your router goes offline, so does your connection to the monitoring center. Cellular communication is often considered the most reliable and secure option. It uses the same networks as cell phones, so it isn’t affected by line cuts or internet outages. Many modern systems use a dual-pathway approach, combining internet and cellular for maximum reliability.
A Look at Commercial Fire Alarm Systems
Fire alarm systems in commercial buildings are typically more complex than their residential counterparts. They are designed to protect a larger area and more people, and they must meet strict regulatory codes. One of the most important features of these systems is that all components are usually interlinked. This means that if a single smoke detector is activated in one part of the building, the alarms will sound everywhere simultaneously. This interconnectedness is crucial for ensuring that everyone is alerted at the same time, regardless of where they are, providing the maximum amount of time for a safe and orderly evacuation.
Understanding Different Protection Levels
Commercial fire alarm systems are categorized based on their primary objective. Some systems are designed mainly for property protection (Category P), with detectors placed in areas of high fire risk to trigger an early response and minimize damage. Others are designed for life protection (Category L), with detectors and sounders placed along escape routes to ensure occupants can get out safely. The most comprehensive systems combine both, offering robust protection for both the building and the people inside it. The specific category required depends on the building’s size, use, and local fire codes.
How to Locate Your Alarm Control Panel
Knowing where your alarm control panel is located is essential for basic maintenance, like changing the backup battery, or for when you need to troubleshoot an issue or plan an upgrade. For wireless systems, this is easy—it’s the main keypad unit on the wall. But for hardwired systems, the control panel is a metal box that installers often place in an out-of-the-way location. It’s usually a beige or gray metal cabinet that doesn’t draw attention to itself. If you didn’t install the system yourself or weren’t there when it was put in, you might have to do a little detective work to find it.
Before you start your search, think about where an installer would have likely placed it. They need access to power and a place to run wires from, so it won’t be in a random spot. It’s almost always located indoors to protect it from the elements. Starting your search in the most common hiding spots will usually lead you right to it. If that doesn’t work, you can try a more methodical approach by tracing the system’s wiring back from a known component, like the keypad or the power transformer. With a little patience, you can find the heart of your system.
Check Common Hiding Spots First
When searching for a hardwired alarm panel, start with the most logical and common locations. Installers prefer places that are concealed but still somewhat accessible for service. The top spots to check first include closets, particularly in a master bedroom, hallway, or utility room. Basements and attics are also very common locations, often mounted to a wall or joist near the electrical panel. Other potential hiding places include storage rooms, the area under a staircase, or a garage. Systematically checking these areas will likely uncover the panel without much trouble.
Tracing Wires and Power Supplies
If you’ve checked all the usual spots and still can’t find your control panel, you can try tracing the wires. Find the alarm keypad on your wall and see if you can spot where the wire bundle goes into the wall or ceiling. You can also look for the system’s transformer, which is a small, boxy plug that is usually screwed into a power outlet in the basement, attic, or a utility closet. This transformer powers the control panel, so if you can find it, you can often trace its low-voltage wire back to the main panel box.
Proper Placement for Alarms and Panels
Installing alarms and control panels in the right locations is just as important as choosing the right equipment. A smoke detector placed too close to a steamy bathroom will be prone to false alarms, while one hidden in a corner might not detect a fire in time. Proper placement ensures your system works effectively and reliably, giving you the earliest possible warning. This principle of thoughtful placement applies to all your safety equipment. Just as you would place an AED package in a central, visible location, your smoke and carbon monoxide alarms need to be positioned where they can best do their job of protecting you and your family.
For both fire and security systems, placement guidelines are often dictated by national standards and local codes. These rules are based on extensive research into how fires spread and how people behave in emergencies. They cover everything from the number of detectors needed for a given space to their exact positioning on a wall or ceiling. Following these guidelines is not just about meeting a requirement; it’s about maximizing your safety. Taking the time to ensure every sensor and panel is correctly installed gives you confidence that your system will perform as expected when you need it most.
Home Fire and Smoke Alarm Placement Guidelines
For comprehensive protection, the National Fire Protection Association (NFPA) recommends installing smoke alarms inside each bedroom, outside each separate sleeping area, and on every level of the home, including the basement. Placing them in common pathways like hallways and stairwells is also critical, as these are often the primary escape routes. The goal is to create a web of detection that ensures an alarm will sound no matter where a fire starts. This layered approach provides the earliest possible warning, which is especially important at night when most fatal home fires occur.
Following NFPA 72 and Local Codes
The primary standard for fire alarm installation in the United States is NFPA 72, the National Fire Alarm and Signaling Code. This document provides detailed requirements for the placement, installation, and maintenance of smoke alarms. While it serves as the national benchmark, your local city or state government may have additional or slightly different rules. It’s always a good idea to check with your local fire department or building code office to ensure your installation is fully compliant with all applicable regulations in your area.
Best Practices for Smoke Alarm Installation
When installing smoke alarms, placement details matter. If you’re mounting an alarm on the ceiling, place it in the center of the room, at least four inches away from any walls. If you’re using a wall mount, it should be placed 4 to 12 inches from the ceiling. Avoid installing alarms near kitchens, bathrooms, or laundry rooms, as steam and cooking fumes can trigger nuisance alarms. Also, keep them away from windows, doors, and air vents where drafts could interfere with their ability to detect smoke, ensuring they are ready to alert you to a real emergency.
Where to Place Carbon Monoxide (CO) Alarms
Carbon monoxide (CO) is an invisible, odorless gas, making reliable detection essential. Because the primary danger of CO poisoning is during sleep, the most important location for a CO alarm is in the hallway outside of sleeping areas. If your home has multiple sleeping areas in different parts of the house, you should have an alarm for each one. It’s also recommended to have at least one CO alarm on every level of your home, including the basement. Unlike smoke, CO mixes freely with air, so alarms can be placed at any height, though many are designed to plug directly into a standard wall outlet.
Rules for Commercial Fire Alarm Panels
In a commercial setting, the fire alarm control panel (FACP) must be installed in a location that is easily accessible to first responders. This is often near a primary entrance, in a reception area, or in a dedicated fire control room. The area should be clean, dry, and well-lit, and the panel should be mounted at a height that allows for easy viewing and operation. It’s also crucial that the panel’s location is clearly marked with signage so that firefighters can find it immediately upon arrival, saving valuable time during an emergency.
Key Maintenance and Legal Standards for Fire Alarms
Installing a fire alarm system is only the first step; ongoing maintenance is what keeps it reliable. Over time, dust can accumulate in sensors, batteries can die, and components can fail. A system that isn’t regularly tested and maintained offers a false sense of security. For businesses and public organizations, there is a legal duty to keep the system in working order. This responsibility involves a routine schedule of inspections, tests, and record-keeping to prove compliance and ensure the system is always ready to function correctly.
These maintenance standards aren’t arbitrary. They are designed to catch potential problems before they lead to a system failure during a real emergency. Simple actions, like monthly testing of smoke detectors and annual professional inspections, can make all the difference. For homeowners, this means regularly pushing the test button and changing batteries at least once a year. For businesses, it involves a more structured program of checks and professional servicing. In both cases, the goal is the same: to ensure that when a fire breaks out, the alarm sounds loud and clear.
UK Fire Alarm Regulations and Requirements
While regulations vary by country, the standards in the United Kingdom offer a great example of a comprehensive approach to fire safety. The BS 5839 code outlines detailed requirements for the design, installation, and maintenance of fire alarm systems in non-domestic buildings. It specifies everything from the types of detectors that should be used in different environments to the minimum sound levels required to alert occupants. These regulations are not just guidelines; they are legal requirements that building owners must follow to ensure the safety of everyone inside.
The Importance of a Fire Alarm Zone Plan
For any large building, a fire alarm zone plan is a critical tool. This is a simple diagram of the building’s layout, displayed next to the main control panel, that shows the different fire alarm zones. When an alarm is activated, the panel indicates which zone the fire is in. The zone plan allows first responders to immediately see where the problem is located, so they don’t have to waste precious time searching the entire building. It’s an essential element for a quick and effective emergency response, ensuring help gets to the right place as fast as possible.
Required Maintenance Schedules
A key part of fire safety regulations involves a strict schedule of maintenance. This often includes daily visual checks of the control panel to ensure there are no fault lights, weekly tests where a manual call point is activated to test the system, and quarterly and annual inspections performed by a qualified technician. These professional inspections are more in-depth and include checking every detector, testing batteries, and verifying that the entire system is functioning as designed. This structured routine ensures the system remains in a constant state of readiness.
Minimum Sound Level Requirements
An alarm is useless if it can’t be heard. That’s why fire codes specify minimum sound levels for alarm systems. Generally, the alarm must be at least 65 decibels (dB) in all accessible areas, or 5 dB above any ambient noise that lasts for more than 30 seconds. In sleeping areas, the requirement is even higher—typically 75 dB at the bed head—to ensure the alarm is loud enough to wake sleeping occupants. These standards are designed to overcome background noise and ensure that the warning is heard by everyone, everywhere in the building.
Is Your Security System Outdated? The 3G Shutdown
Many older security systems rely on 3G cellular networks to communicate with their monitoring centers. However, mobile carriers have been phasing out their 3G networks to make room for newer technologies like 5G. This “3G sunset” means that if your alarm system uses a 3G communicator, it may have already stopped working or could stop at any moment. This would leave your property unmonitored without you even realizing it. It is crucial to check with your security provider to determine if your system is affected and to schedule an upgrade to a 4G or 5G-compatible communicator if needed.
The 3-Minute Rule: Where to Place Your AED
When a person suffers sudden cardiac arrest, every second counts. The American Heart Association notes that survival chances decrease significantly with each passing minute. The goal is to have a rescuer reach the victim, retrieve the AED, and deliver a shock within three minutes. This is the “3 minute rule,” and it should be the guiding principle for choosing your AED station’s location.
To find the best spot, identify central, high traffic areas. Think about places like the main lobby, a hallway near an elevator, a staff break room, a community hall, or next to the court in a gymnasium. The ideal location is easy to see and access for everyone.
To ensure accessibility, you should also follow Americans with Disabilities Act (ADA) guidelines. These best practices recommend mounting the AED so that its handle is no more than 48 inches from the floor. If the cabinet is not recessed into the wall, it should not protrude more than 4 inches to avoid becoming an obstruction in a hallway.
How to Choose the Right AED Cabinet
The cabinet is the cornerstone of your AED station. It protects your device, enhances visibility, and can even act as a notification system. Choosing the right one depends entirely on your environment. Rather than a one size fits all approach, use this framework to decide.
For Quiet Spaces: Homes and Small Offices
In a controlled setting where the device is secure from theft or tampering, a standard AED wall cabinet is an excellent choice. It keeps the AED protected from dust and damage while ensuring it is clearly visible and ready for use without any loud alarms that might be unnecessary in a private space.
For Public Areas: Lobbies and Hallways
In public or semi public spaces, an alarmed AED cabinet provides an essential layer of security and awareness. When the door is opened, a loud alarm sounds. This serves two key purposes, it deters potential theft and immediately alerts anyone nearby that the AED has been deployed for a possible emergency.\
For Noisy Environments: Schools, Gyms, and Factories
A loud alarm can easily be drowned out in a bustling school hallway, a loud gymnasium, or a factory floor. For these locations, an alarmed cabinet with a strobe light is the best option. The bright, flashing light provides a powerful visual alert that cuts through ambient noise, ensuring staff and bystanders are aware of the situation.
For Outdoor or Harsh Conditions
AEDs contain sensitive electronics that need protection from extreme temperatures, moisture, and dust. For outdoor placements at sports complexes, pools, or work sites, a dedicated outdoor weatherproof cabinet is non negotiable. These rugged enclosures are designed to shield the device from the elements and maintain its readiness.
Why Clear Signage is So Important
During an emergency, a panicked rescuer needs to find the AED instantly. Clear and effective signage is crucial for creating a “path of sight” that leads people directly to the station. Placing a small sign just on the cabinet is not enough.
Think about the approaches to your AED station. Use a 3D projecting sign, often called a v sign, at the start of a long hallway so it can be seen from either direction. Place a flat wall sign directly above the cabinet for immediate identification. For office suites or rooms, an AED window decal on the door lets people know a life saving device is inside. Proper signage removes guesswork and saves precious time.

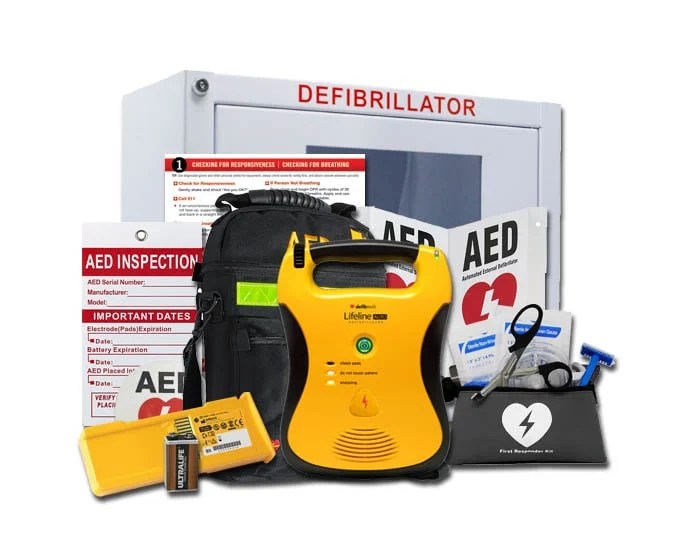
Stocking Your Station: Must-Have Accessories
The AED and cabinet are the core of your station, but a few key accessories transform it from a simple setup into a comprehensive readiness system.
Spare and Pediatric Electrode Pads
AED electrode pads are for one time use only. After any event, they must be replaced. Having a spare set of adult pads, like the HeartSine Samaritan Pad-Pak, ensures your AED can be put back into service immediately. If children are ever present at your location, such as in a school or community center, having a set of pediatric pads is essential. These pads deliver a reduced shock dose appropriate for a child.
A Fast Response Kit
A sudden cardiac arrest victim may be wearing thick clothing, or a person with a hairy chest may prevent the pads from making good skin contact. A Fast First Response Kit contains the essential tools to overcome these challenges, including trauma shears, a prep razor, and nitrile gloves. Keeping one of these kits with your AED can save critical seconds when it matters most.
Inspection and Maintenance Tools
Regular checks ensure your AED is ready to perform. Simple tools like AED inspection tags help you keep a physical log of monthly checks. For even greater convenience and peace of mind, the Response Ready App automates readiness checks and compliance reminders, making it simple to manage one or even multiple devices across different locations.

Putting It All Together: Sample Station Setups
Putting it all together can seem daunting, but it doesn’t have to be. Here are a few sample blueprints to help you visualize a complete station for different environments.
The Home Station Setup
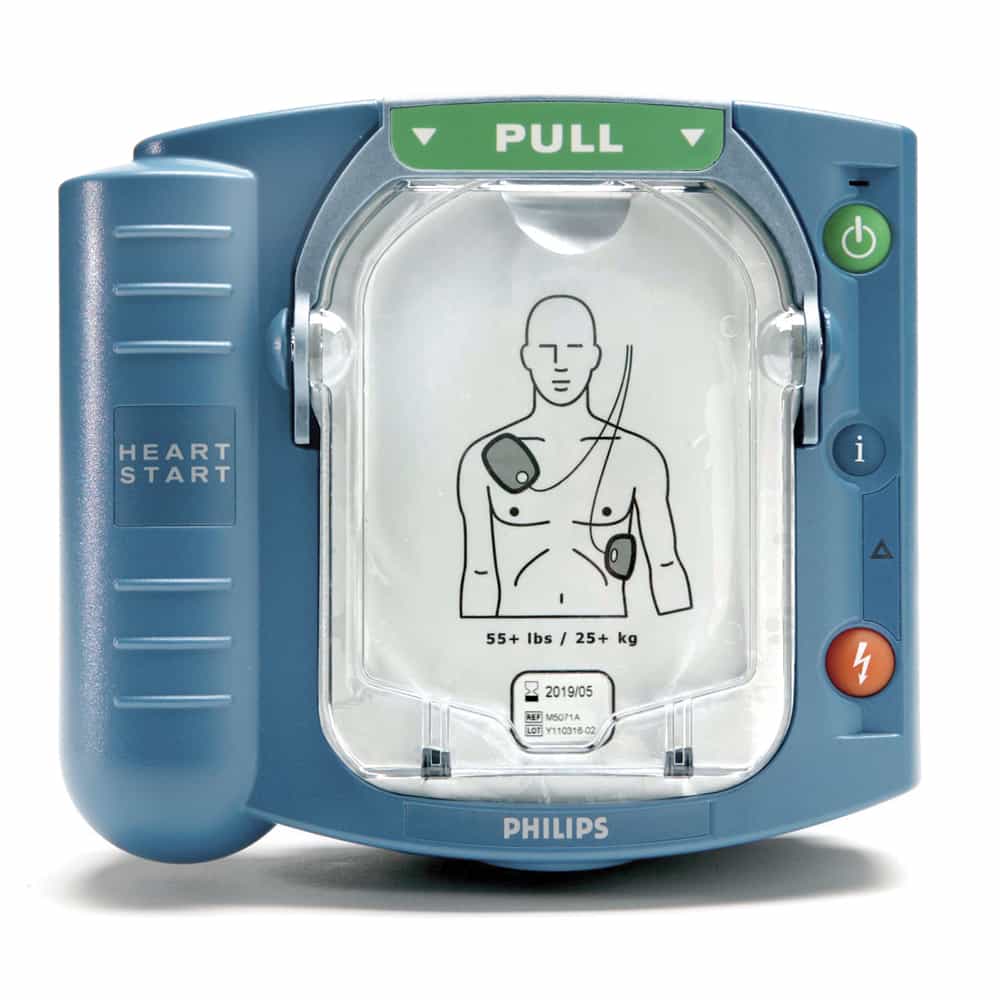
For home use, prioritize simplicity and ease of use. A great setup includes a user friendly device like the Philips HeartStart OnSite, a standard non alarmed cabinet, and a single wall sign placed in a central area like the kitchen or living room.
The School or Community Center Setup
These locations require high visibility and readiness for all ages. An ideal setup features a fully automatic AED like the HeartSine Samaritan PAD 360P, an alarmed cabinet with a strobe light, 3D projecting signage in hallways, a Fast Response Kit, and a spare Pediatric Pad-Pak.
The Small Business Setup
For an office or small business, durability and compliance are key. Consider a rugged device like the Defibtech Lifeline AED, an alarmed cabinet to alert staff, clear signage, and enrollment in an AED program management service, such as the Response Ready App, to effortlessly track maintenance and compliance.
Ready to Build Your Lifesaving Station?
By focusing on location, choosing the right cabinet, installing clear signage, and including the necessary accessories, you can create an AED station that inspires confidence. You are no longer just buying a device, you are building a complete system designed to empower anyone to become a hero.
Now that you have the framework, you can confidently build your own custom AED value package. Select your cabinet, add spare pads, and get everything you need in one place. If you have questions, our experts are available via live chat or phone to help you choose the perfect setup.
Ready to take action? Shop AED station components at Response Ready.
Frequently asked questions
Q: How do I know if I need an alarmed cabinet?
A: If your AED is in an unsupervised public area, an alarmed cabinet is highly recommended. The alarm deters theft and alerts people that an emergency may be in progress. For a secure location like a private home or a small, supervised office, a standard non alarmed cabinet is usually sufficient.
Q: What are pediatric pads and do I need them?
A: Pediatric pads are designed to deliver a lower energy shock suitable for children under 8 years old or weighing less than 55 pounds. If your facility is a school, daycare, community center, church, or any place children frequently visit, having a set of pediatric pads is a critical part of being prepared.
Q: What is a Fast Response Kit and why is it important?
A: A Fast Response Kit contains essential tools like trauma shears, a prep razor, and gloves. These items are vital for quickly preparing a victim for pad placement, especially if they are wearing heavy clothing or have a hairy chest that could interfere with adhesion. It saves critical seconds during a rescue.
Q: How high should I mount the AED cabinet?
A: To comply with ADA accessibility guidelines, the handle of the AED or the opening of its cabinet should be no higher than 48 inches from the floor. This ensures the device is within reach for as many people as possible, including those in a wheelchair.
Q: How can I manage readiness checks for multiple AEDs?
A: Managing multiple devices is simple with modern tools. The Response Ready App helps you automate monthly readiness checks and compliance reminders right from your phone. As users have noted, it makes managing defibrillators across different buildings convenient and intuitive.
Key Takeaways
- Create a complete life-saving station: An AED is just the start. Make it truly effective by placing it in a visible, central location, choosing the right cabinet for your environment, and using clear signage to guide people during an emergency.
- Understand and maintain your safety systems: True preparedness means ensuring all your equipment is reliable. Locate your alarm system’s control panel for maintenance and confirm it doesn’t rely on an outdated 3G network for communication.
- Stock your station for real-world scenarios: A rescue rarely happens in a perfect setting. Equip your AED with a Fast Response Kit to handle challenges like clothing or body hair, and keep spare adult and pediatric pads on hand so you’re prepared for any victim.
Related Articles